Top Commonly Used Spring Boot Annotations
All commonly used annotations in one article!

When I started learning SpringBoot, annotations make the development much simpler but I hardly tried to understand the actual meaning behind each annotation.
So in this article, I will share the most commonly used Spring Boot Annotations and the reason for using them.
1. @Bean
Bean is a method-level annotation that produces a bean(object) to be managed by the spring container.
It is the same as the XML 'bean' tag.
To understand we have created a Student class.
public class Student {
    String name;

    public Student(String name) {
        this.name = name;
    }
}
Now if we want Student class bean, we need to declare the bean in the config class.
@Configuration
public class AppConfig {

    @Bean // Bean applied on method - Method level annotation
    public Student student(){
        return new Student("student1");
    }
}
Whenever JavaConfig encounters the student() method, it will execute that method and register the return value in the BeanFactory.
The default name of the bean will be the same as the method name.
2. @Configuration
You might have noticed this annotation in the above example.
Configuration annotation is a class-level annotation.
This marks the class as a source of one or more beans and tells spring container to generate bean definitions.
3. @Component
Suppose we want a class object at the start of our Spring Application.
We make use of this annotation.
Using @Component we tell Spring, "Hey, I need this when my application starts!".
So, spring stores this bean or object in the spring container at the start of the application.
@Component
public class Animal {
    String type;
    String color;

    public Animal(){
        System.out.println("Animal Created");
    }

    public Animal(String type, String color) {
        this.type = type;
        this.color = color;
    }
}
When we start the application.
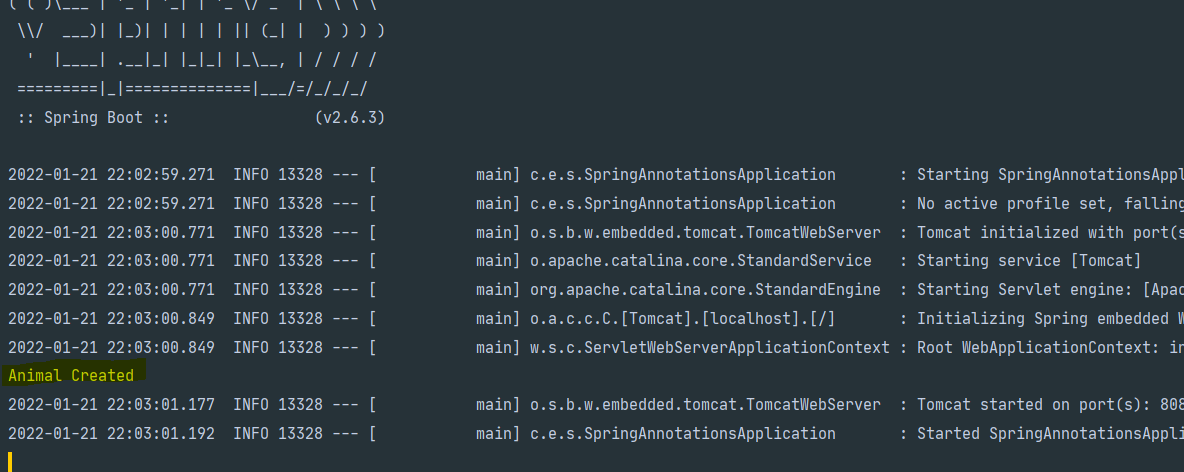
We have created the Animal object because we need to use that.
How to use the Animal object, with the 'new' keyword? No
Here comes Autowired annotation.
4. @Autowired
(Already discussed in this article)
When we want to insert an object implicitly we make use of this annotation.
Suppose, we have an Address class which is a Component that means its object is already available in the Container.
@Component
public class Address {
    int roomNo;
    String buildingName;
    String city;

    public Address() {
        System.out.println("Address Object Created");
    }

    public int getRoomNo() {
        return roomNo;
    }

    public void setRoomNo(int roomNo) {
        this.roomNo = roomNo;
    }

    public String getBuildingName() {
        return buildingName;
    }

    public void setBuildingName(String buildingName) {
        this.buildingName = buildingName;
    }

    public String getCity() {
        return city;
    }

    public void setCity(String city) {
        this.city = city;
    }
    public void showAddress(){
        System.out.println("Hi, from Address");
    }
}
Also, we have a Student class where each student also has an Address.
@Component
public class Student {
    private int id;
    private String name;
    private double percentage;
    private Address address;

    public Student() {
        System.out.println("Student Object Created");
    }

    public String getName() {
        return name;
    }

    public void setName(String name) {
        this.name = name;
    }

    public int getId() {
        return id;
    }

    public void setId(int id) {
        this.id = id;
    }
    public double getPercentage() {
        return percentage;
    }
    public Address getAddress() {
        return address;
    }

    public void setAddress(Address address) {
        this.address = address;
    }

    public void setPercentage(double percentage) {
        this.percentage = percentage;
    }
    public  void display(){
        address.showAddress(); //calling Address class method
        System.out.println("Hi,from Student");
    }
}
Now let's see the output
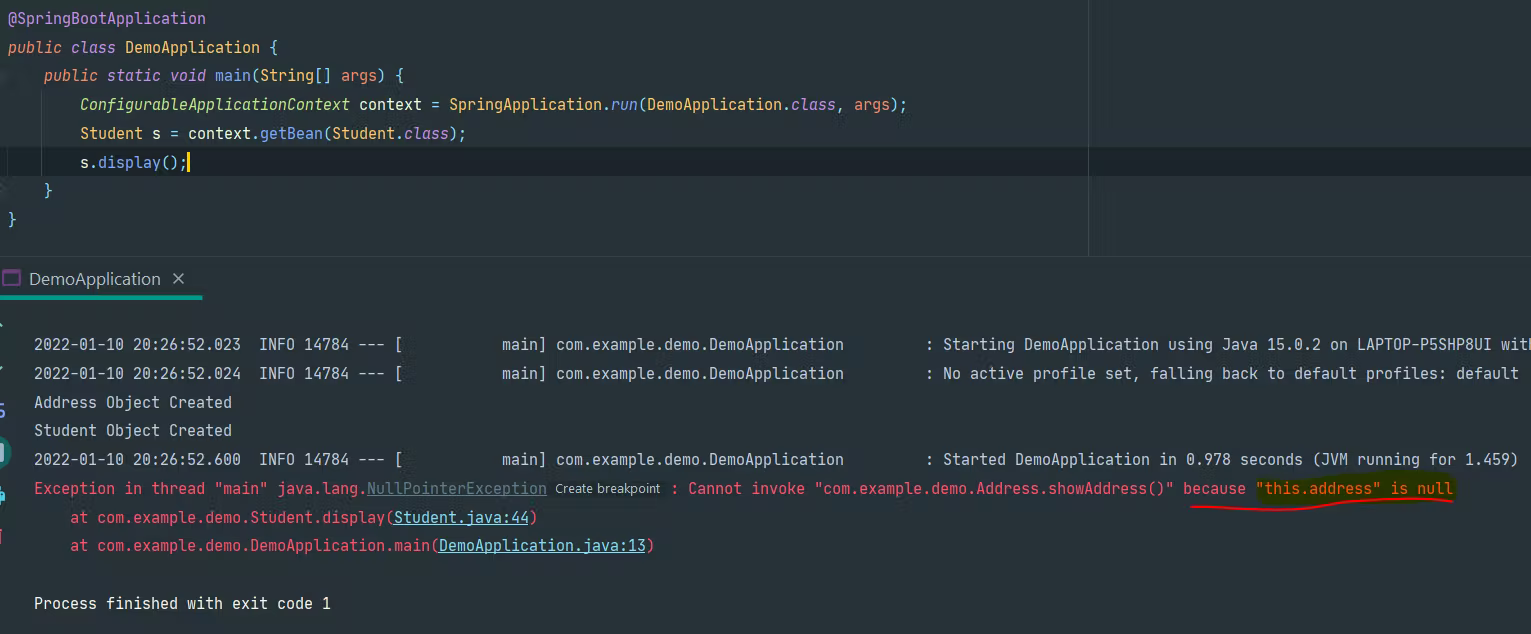
Here it says the address is null.
Why this error?
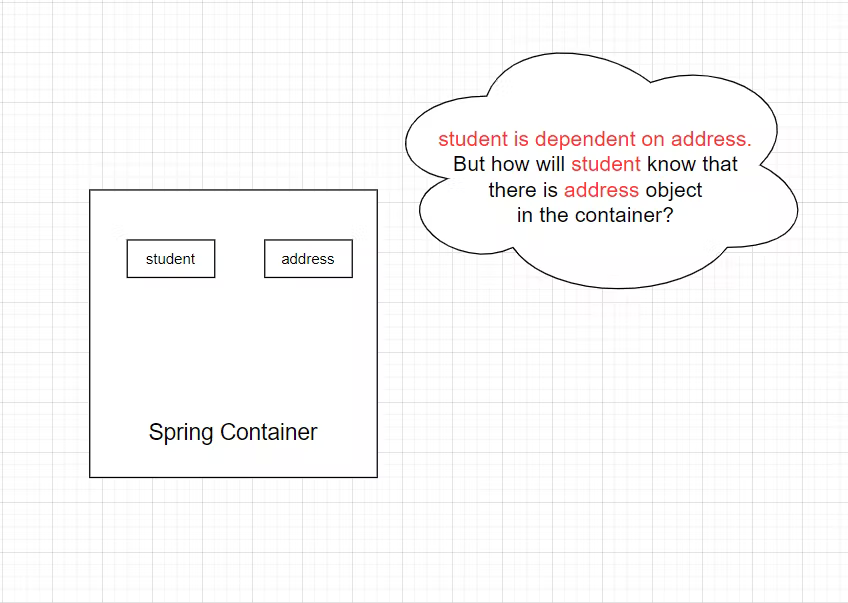 As we have added @Component annotation, there are 2 objects in the container but how the student will know that address is available?
We have to connect student with address, here comes Autowire.
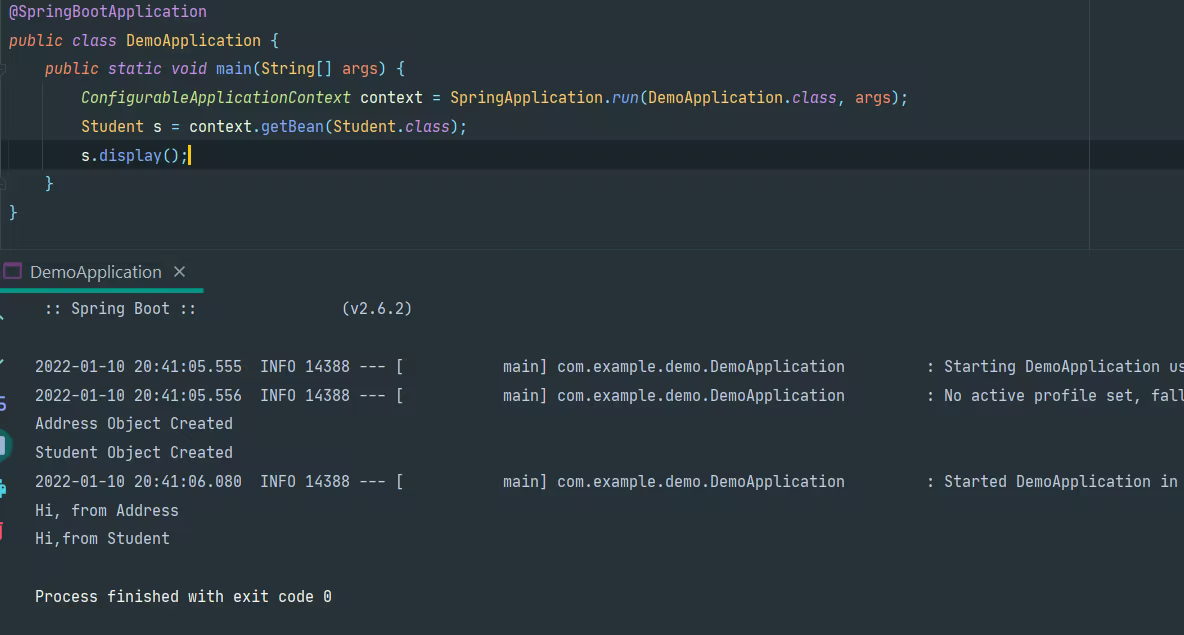
We will tell the student class that there is an address object available using the @Autowired annotation.
package com.example.demo;
import org.springframework.beans.factory.annotation.Autowired;
import org.springframework.stereotype.Component;
@Component
public class Student {
    private int id;
    private String name;
    private double percentage;
    @Autowired
    private Address address;

    public Student() {
        System.out.println("Student Object Created");
    }

    public String getName() {
        return name;
    }

    public void setName(String name) {
        this.name = name;
    }

    public int getId() {
        return id;
    }

    public void setId(int id) {
        this.id = id;
    }
    public double getPercentage() {
        return percentage;
    }
    public Address getAddress() {
        return address;
    }

    public void setAddress(Address address) {
        this.address = address;
    }

    public void setPercentage(double percentage) {
        this.percentage = percentage;
    }
    public  void display(){
        address.showAddress();
        System.out.println("Hi,from Student");
    }
}
5. @Component Scan
@ComponetScan annotation is used with @Configuration annotation which is used to tell spring the packages for the annotated components.
By default, spring will auto scan for annotated components in the current package (containing the SpringBoot main class) and its sub-packages.
Let's understand this with an example.
We have created a Class Vehicle in a different package than the main class.
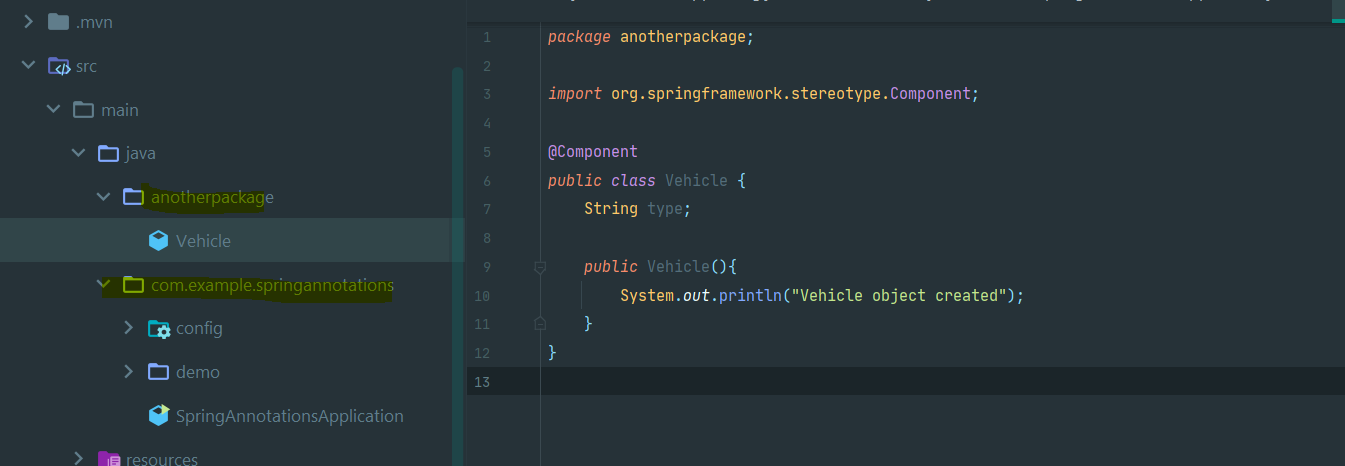
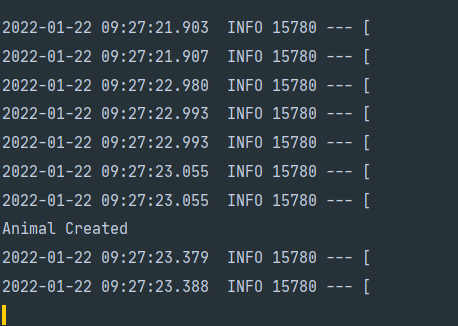
When we start the application let's see whether the object is created or not.
No, we did not get the vehicle object
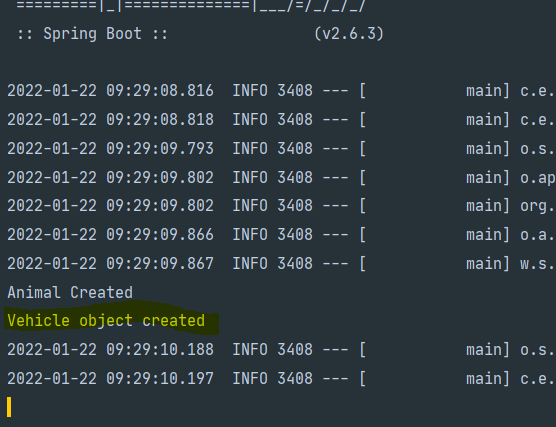
Now in the configuration class, we need to tell Spring about the package of the class Vehicle using @ComponentScan
import org.springframework.context.annotation.ComponentScan;
import org.springframework.context.annotation.Configuration;

@Configuration
@ComponentScan({"anotherpackage"})
public class AppConfig {

    @Bean // Bean applied on method - Method level annotation
    public Student student(){
        return new Student("student1");
    }
}
Spring will scan all classes in "anotherpackage" and its sub-packages.
7. @SpringBootApplication
This annotation is applied to the Main class of the SpringBoot project.
import org.springframework.boot.SpringApplication;
import org.springframework.boot.autoconfigure.SpringBootApplication;

@SpringBootApplication // same as @Configuration @EnableAutoConfiguration @ComponentScan
public class Application {

    public static void main(String[] args) {
        SpringApplication.run(Application.class, args);
    }

}
It is the combination of 3 Annotations
a) @Configuration - makes the class a Java Configuration class and allows to create beans in the spring context.
b)@ComponentScan - scans all the annotated components in the current package and its sub-packages
c) @EnableAutoConfiguration - enables Spring Boot’s auto-configuration mechanism.
Spring Boot auto-configuration attempts to automatically configure your Spring application based on the jar dependencies that you have added.
For example, if HSQLDB is on your classpath, and you have not manually configured any database connection beans, then Spring Boot auto-configures an in-memory database.
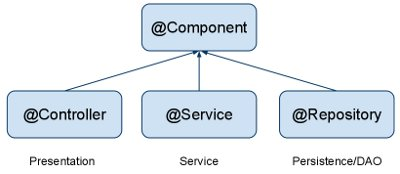
We have seen @Component annotation, it is a generic annotation of Spring-managed component.
@Repository, @Service, and @Controller are specializations of @Component for more specific use cases, for example, in the persistence, service, and presentation layers, respectively.
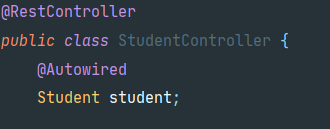
8. @Controller
It is a specialization of component and makes the annotated class a presentation layer.
import org.springframework.stereotype.Controller;

@Controller
public class StudentController {
}
9. @Service
All the business logic should be in @Service annotated classes.
import org.springframework.stereotype.Service;

@Service
public class StudentService {
}
10. @Repository
All the DAO classes are annotated with @Repository.
It contains all the database access logic.
import org.springframework.stereotype.Repository;

@Repository
public class StudentDAO {
}
Spring MVC annotations
We will understand all the annotations with this example.
@Controller
@ResponseBody
public class StudentController {
    @Autowired
    Student student;

    @RequestMapping(value = "/student",method = RequestMethod.GET)
    Student getStudent(){
        student.setName("Sachin");
        return student;
    }
    @RequestMapping(value = "/user/{id}",method =RequestMethod.GET )
    String user(@PathVariable("id") Integer id){
        return String.valueOf(id);
    }

    @PostMapping("/add-student")
    String addStudent(@RequestBody Student s){
        //add Student to database
        return s.getName()+" added";
    }
}
We have already understood @Controller which makes the class an MVC controller and acts as a presentation layer.
@ResponseBody - When we return data from request handlers, to serialize data to JSON @ResponseBody is used.
If we consider the below request handler.
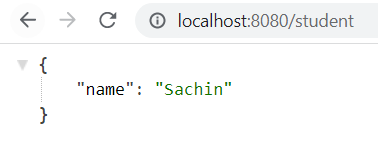
@RequestMapping(value = "/student",method = RequestMethod.GET)
    Student getStudent(){
        student.setName("Sachin");
        return student;
  }
@RequestMapping is used to map HTTP requests to handler methods.
So, "/student" will be mapped to getStudent() method.
RequestMethod.GET says this method is GetRequest.
Instead of @RequestMapping(method = RequestMethod.GET), we can use @GetMapping which maps HTTP GET requests to the mapped controller methods.
@GetMapping(value = "/student")
    Student getStudent(){
        student.setName("Sachin");
        return student;
    }
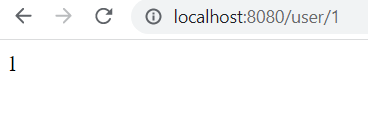
 Now, let's focus on this handler method where we pass id in the path variable.
@RequestMapping(value = "/user/{id}",method =RequestMethod.GET )
String user(@PathVariable("id") Integer id){
        return String.valueOf(id);
 }
To catch the {id} we need to use @PathVariable annotation.
The string inside @PathVariable should match with the {id}.
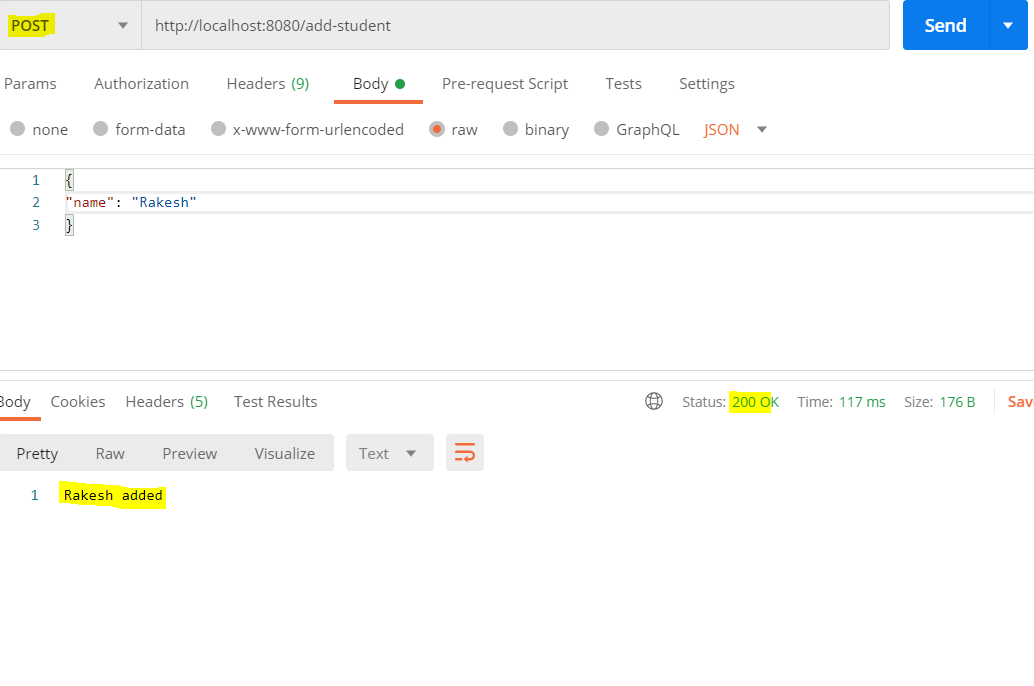
 @PostMapping("/add-student")
    String addStudent(@RequestBody Student s){
        //add Student to database
        return s.getName()+" added";
    }
Here we are passing Student details along with the URL.
For that we need to use @RequestBody, this will deserialize JSON to Student object.
Since we are sending data to the handler method we have used @PostMapping annotation.
@RestController Annotation
@Controller + @ResponseBody = @RestController
Conclusion
So in this article, out of many, I have shared commonly used annotations.
If you find this helpful do like it.
Any suggestions/feedback, please comment below.
Thanks for Reading
BYE!


